Nail Marbling

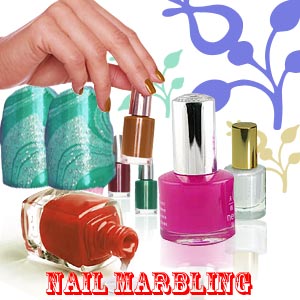
If you are tired of staid French manicures and boring nail colors, jazz up your nails with nail marbling. Nail marbling technique involves transferring multi-hued designs of nail color made on water onto your nails. This nail art practice draws its inspiration from the Turkish nail painting form called ebru. Creating swirl nail art is not easy. It is easier if you transfer the swirl design on to acrylic tips and then fix them onto your nails. Look up simple tips on nail marbling. Find out how you can do nail swirls at home.
For a special occasion, why not consider getting nail swirls. You can complement the colors to suit your outfit. Nail marbling is another way of wearing your favorite nail colors; albeit in attractive tie-dye patterns. In fact you don't need an occasion to get your nail marbling done. Try it a few times till you get it right!
Nail marbling technique
Ensure that the nails are correctly prepped for marbling. Ensure that they are clean and all traces of polish have been removed. Use a base coat. Fill a cup with water almost up to the brim. Use a glass or ceramic bowl. Drop in your favorite nail polish or even a couple of colors. Choose colors that are complementary so that you can come up with a pleasing design. Of course, vibrant opposites can also create dramatic designs. You can embellish your nail marbling with gemstones or glitter. You can let your creativity run riot with nail swirling designs. The final effect of nail marbling depends on the saturation and opacity of the colors used.
Remember that nail marbling means that each of your nails will have a different pattern. No two nails will look alike. The effect is creative and eye-catching. For your nail marbling session, you will need:
- Nail polish in your preferred colors
- White or neutral base nail color
- Cuticle oil or Vaseline
- Nail art tool or toothpick or nail art brush
- Nail polish remover
- Cotton balls
- Cup of water at room temperature
Nail marbling tips
Choose nail polish of good quality; with even consistency. Nail colors of poor quality might sink to the bottom or give a design of uneven texture. You may need to try the designs many a times to get it right. Its largely about timing as the nail polish hardens quickly on the water surface. Timing is critical with marbling so being fully prepared is a must.
You can use a pin or needle to create design swirls. Once you have created a pattern that you like, dip your nail into it. Use the orange stick to pull off the excess nail polish. When you dip your finger into the pattern, take care not to disturb the pattern. Slowly lift it over the water to let it adhere to the nail surface. Shake off the excess water lest bubbles are formed.
Nail swirls
Another version of nail marbling is without water. You can add a couple of dots of different nail polishes on your nail. Quickly move the dots around to create patterns. Use swirling movements or just the figure eight movement. You can pick up a marbling tool for detailed designs and spots and shaping the colors.
Alternatively you can use a fine point nail art brush. This is useful when you are creating dots or flowers. These tools are less messy and allow you to dip the tool tip into the colors and create patterns on your nails. Seal your nail marbling with a clear coat. You can swirl and play around with the nail polish to get exciting designs. Use a zigzag motion or try a wavy motion.
Top of the Page: Nail Marbling
Tags:#nail marbling #nail water marbling #marble nail design #nail art marbling #nail swirling #ebru
 Beauty
 Hair Loss Remedy
DIY Lip Care
Peel Off Lip Color
Moroccan Oil Treatment
Dead Sea Black Mud
Nail Polish Pen Set
Eyebrow Shaping
Long Eyelashes
Tanning Salon
Pedicure
Fish Pedicure
Nail Marbling
Nail Polish
Acrylic Nail
Yellow Nails
Hand Creams
Peeling Cuticles
Cosmetic Surgery
Makeup Foundation
Whiten Teeth Naturally
Tooth Whitening
Salon Spa
Skin Care
Aging Gracefully
Facial Hair Removal for Women
Face Mist
Fragrance
Long Lasting Lipstick
Body Art
Manicure Tips
Cellulite Treatment
Mesotherapy
Colored Contact Lens
Crow's Feet
Acupuncture and Weight Loss
Top of the Page: Nail Marbling
Popularity Index: 101,126